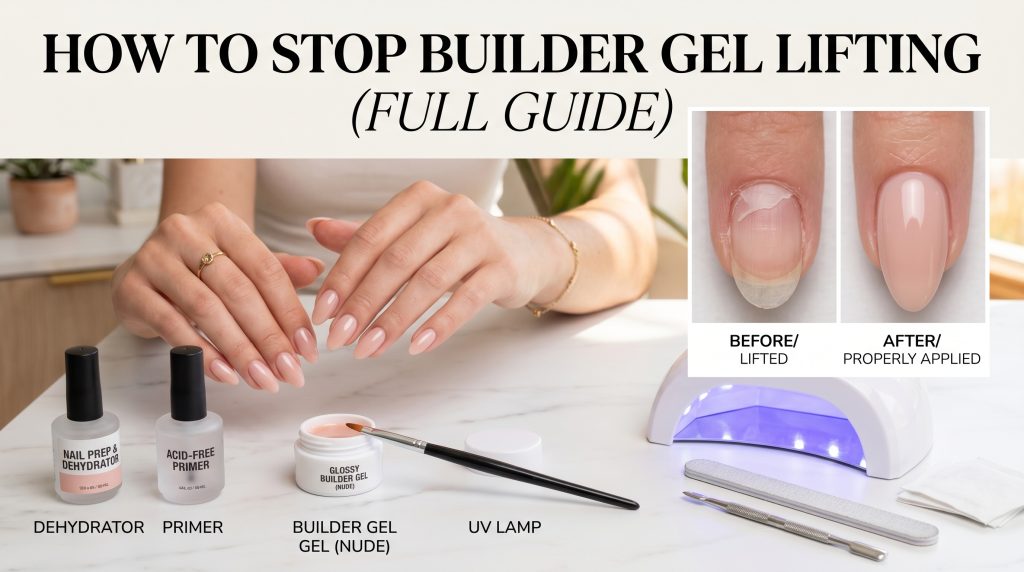
Introduction
You know that feeling when you want gorgeous, long-lasting nails but can’t decide between acrylic and gel? Acrylics are strong but smell terrible and can damage your nails. Gel is gentle but not durable enough for extensions. There has to be something in between, right?
I remember staring at my sad, broken nail for the hundredth time, frustrated with spending $60+ at salons every few weeks. That’s when I discovered polygel—and honestly? It changed everything.
Here’s the thing about learning polygel nails tutorial techniques: they’re not as hard as you think. In fact, poly gel nails tutorial videos have over 500 million views on TikTok because people are realizing they can do this at home. Polygel is this magical hybrid that combines the best of acrylic and gel—stronger than gel, more flexible than acrylic, and way less messy than either.
Whether you’re searching for a comprehensive poly gel nails guide or just want to master polygel nails application so you can create beautiful poly gel nails design looks, this tutorial has everything you need.
Ready to become your own nail tech? Let’s dive in! 💅✨
What Is Polygel? Understanding the Hybrid Hero
Before we jump into the polygel nails tutorial, let’s understand what makes polygel so special.
Polygel is a hybrid nail enhancement that combines the best properties of acrylic and hard gel. It comes in a tube like toothpaste and has a unique putty-like consistency that’s easy to control.
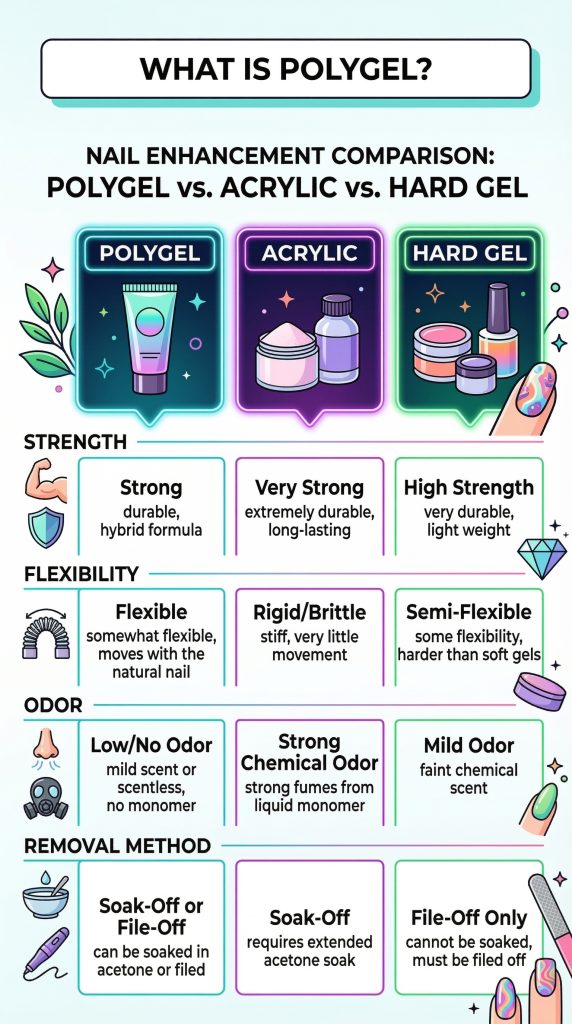
Why polygel is taking over in 2026:
- 📈 Searches for polygel nails tutorial have increased 150% year over year
- 💪 Lightweight but incredibly strong
- 🎨 Won’t run or drip during application
- 🌿 Often odorless and gentler than acrylics
- ⏱️ Cures quickly under LED lamp
Polygel Nails Tutorial: What You’ll Need
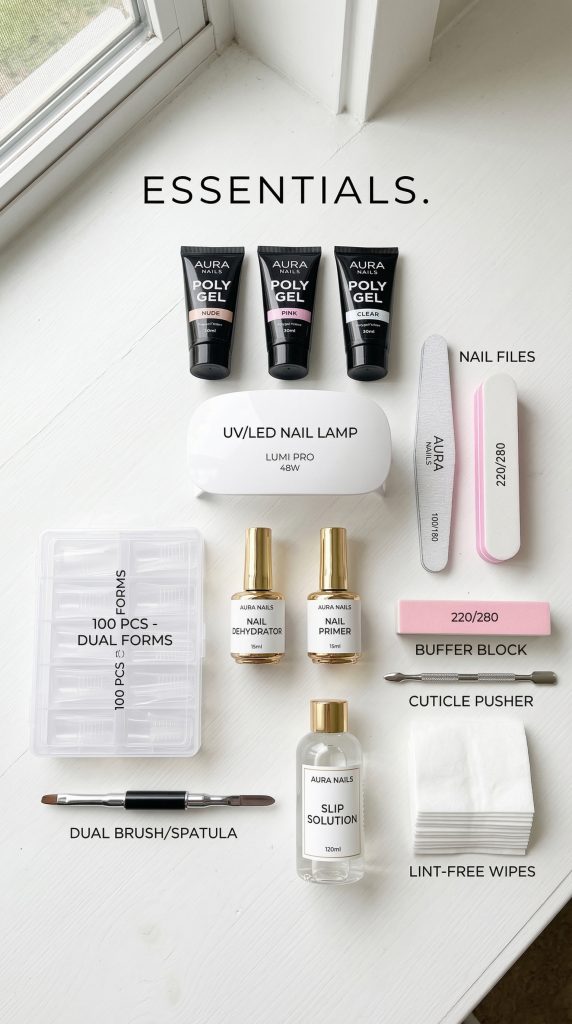
Before starting your poly gel nails tutorial, gather all your supplies. Having everything ready before you begin is half the battle!
Essential Supplies:
| Item | Purpose | Beginner Tip |
|---|---|---|
| Polygel | Creates the nail enhancement | Start with clear or sheer pink for forgiving application |
| UV/LED Lamp | Cures the gel | At least 48W recommended |
| Nail Forms or Tips | Creates extensions | Dual forms are EASIEST for beginners |
| Polygel Brush | Shapes the product | Silicone brushes are great for beginners |
| Slip Solution (99% alcohol) | Prevents sticking | Don’t skip this! |
| Nail File & Buffer | Shapes and smooths | 100/180 grit is perfect |
| Nail Dehydrator & Primer | Ensures adhesion | Essential for longevity |
| Cuticle Pusher | Preps natural nails | Metal or wood both work |
| Lint-free Wipes | Cleaning | Paper towels leave lint! |
Nice to Have:
- Dual forms (easier for beginners!)
- Nail cleanser
- Cuticle oil
- Nail art supplies
Pro tip: Don’t cheap out on your lamp! A good LED lamp makes curing faster and more reliable.
Polygel Nails Tutorial: Step-by-Step Application
Ready for the complete polygel nails tutorial? Follow these steps carefully, and remember—patience is your best friend!
Step 1: Prep Your Natural Nails
This is the MOST important step. Skipping prep = lifting and failure.
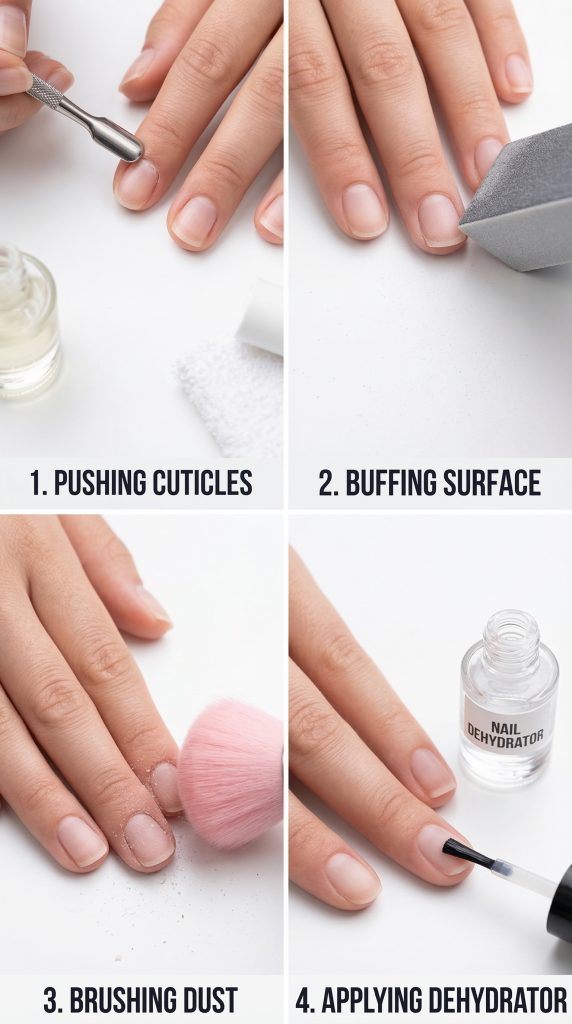
What to do:
- Gently push back cuticles (don’t cut them!)
- Lightly buff the nail surface to remove shine
- Shape natural nails if keeping them short
- Brush away all dust
- Apply nail dehydrator to remove oils
- Apply primer (wait for it to dry completely)
Common mistake: Not prepping enough leads to lifting within days. Take your time here!
Pro tip: After dehydrator, don’t touch your nails! Oils from your fingers will undo all your hard work.
Step 2: Choose Your Application Method
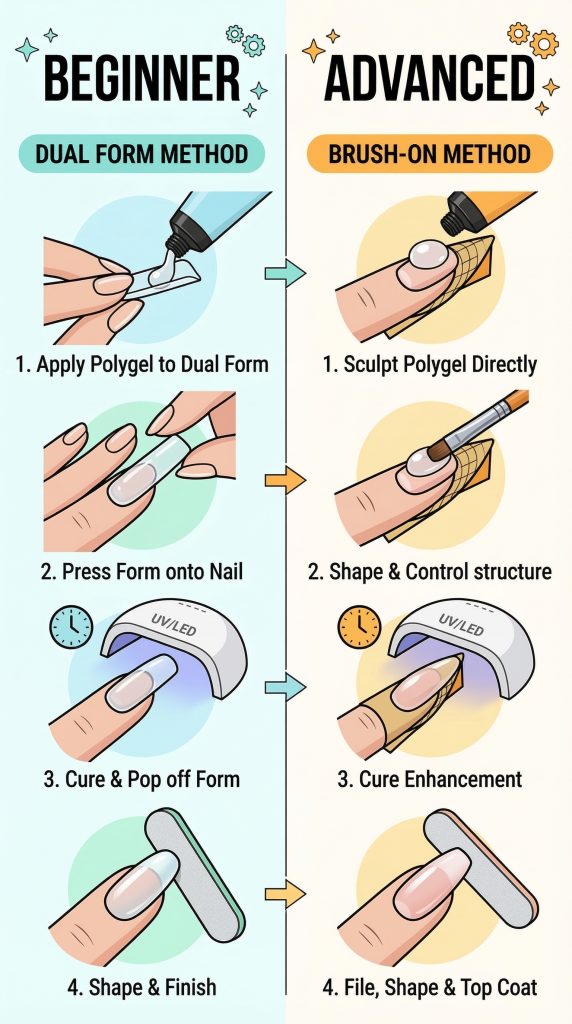
Two ways to apply polygel:
Method A: Dual Forms (EASIEST for Beginners)
- Apply slip solution to the form
- Squeeze polygel into the form
- Press onto your nail at an angle
- Cure under lamp
- Gently remove form
- Shape and file
Method B: Brush-on (More Control)
- Apply slip solution to brush
- Pick up a polygel bead
- Place at cuticle area
- Pat and shape with brush
- Cure, then add more layers
- File and shape
For beginners: Start with dual forms! They’re way more forgiving and perfect for first-time polygel nails tutorial followers.
Step 3: Apply Polygel (Dual Form Method)
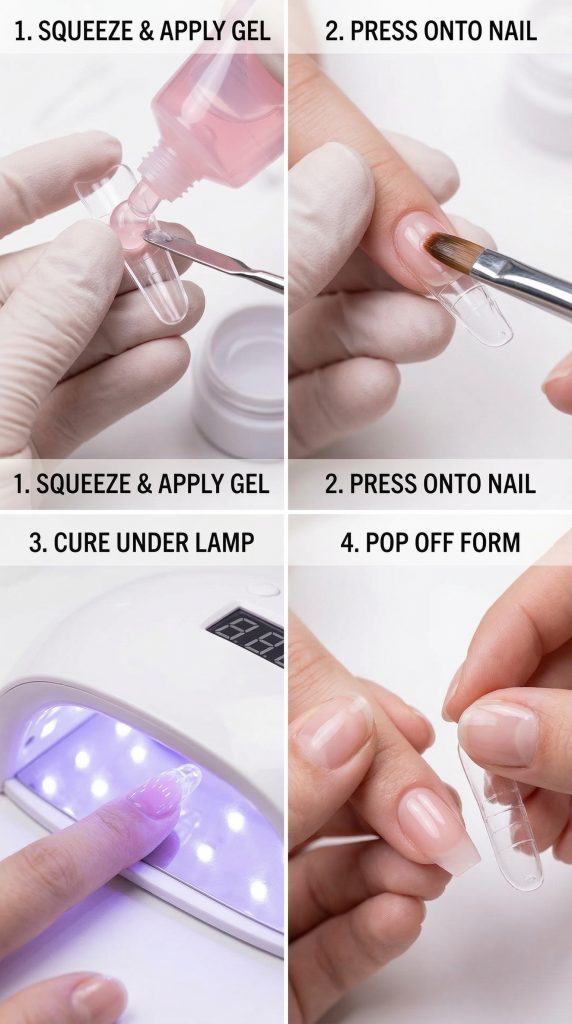
Step-by-step:
- Squeeze a small amount of polygel into the form (don’t overfill!)
- Use brush with slip solution to spread evenly
- Press onto nail at 45-degree angle, then flatten
- Hold for a few seconds, wipe away excess with slip solution
- Cure under lamp (30-60 seconds depending on lamp)
- Gently twist form to remove
- Repeat for all nails
Common mistake: Too much polygel! Less is more—you can always add, but removing is hard.
Pro tip: The perfect amount is about the size of a grain of rice for short nails, slightly more for longer.
Step 4: Apply Polygel (Brush-on Method for Advanced Beginners)
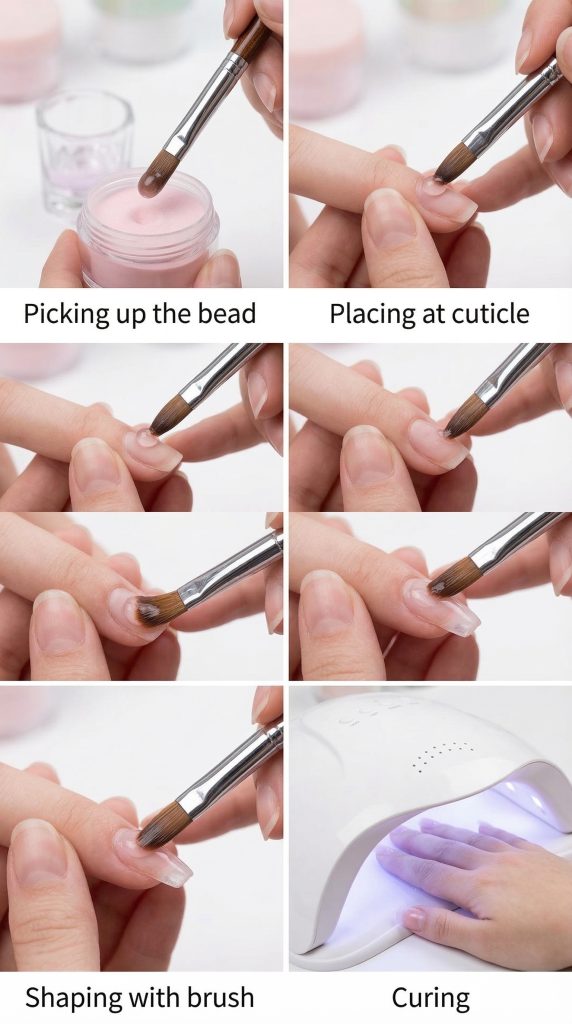
Step-by-step:
- Dip brush in slip solution
- Pick up a small bead of polygel
- Place at cuticle area (not touching skin!)
- Gently pat and push toward tip
- Shape with brush, adding slip as needed
- Cure, then add more layers for length
- File and shape
Pro tip: Work in thin layers. Thick layers can trap heat and cure unevenly.
Step 5: Shape Your Polygel Nails
Once all nails are cured, it’s shaping time!
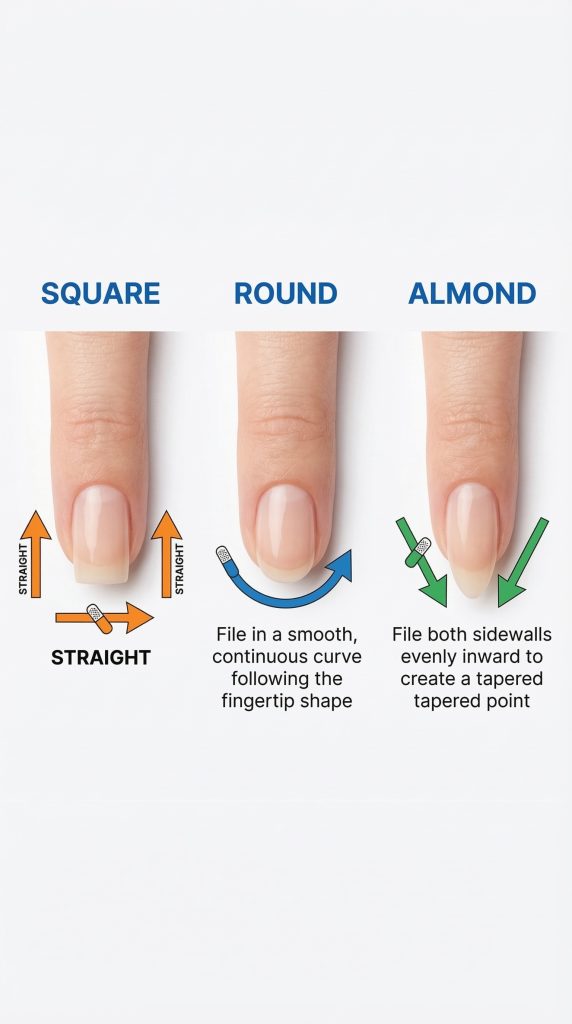
Basic shapes for beginners:
- Square: File straight across, slightly soften corners
- Round: File in a curved motion following fingertip
- Almond: File sides inward, round the tip (trickier, save for later!)
Filing technique:
- Use coarse file (100 grit) for bulk removal
- Shape from underneath first
- File sides evenly
- Refine with finer file (180 grit)
- Buff surface for smoothness
Pro tip: File in one direction only—sawing back and forth weakens the polygel.
Step 6: Perfect Your Surface
A smooth surface is essential for beautiful poly gel nails design.
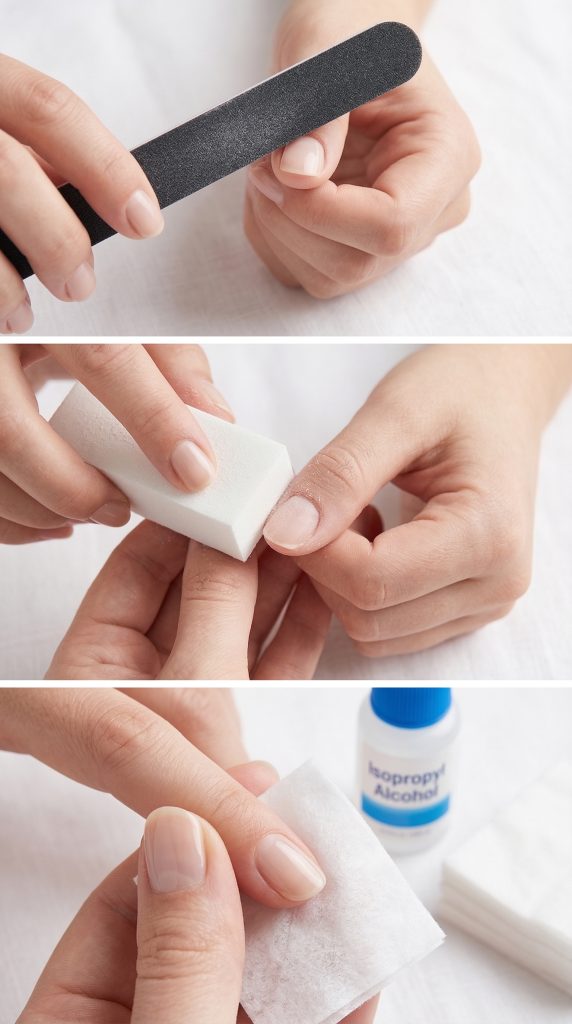
Smoothing steps:
- Check for lumps or uneven areas
- File gently to smooth
- Buff entire surface to remove file marks
- Wipe with alcohol to remove dust
- Apply top coat and cure
Step 7: Add Color and Design (Optional)
Now for the fun part—adding poly gel nails design elements!
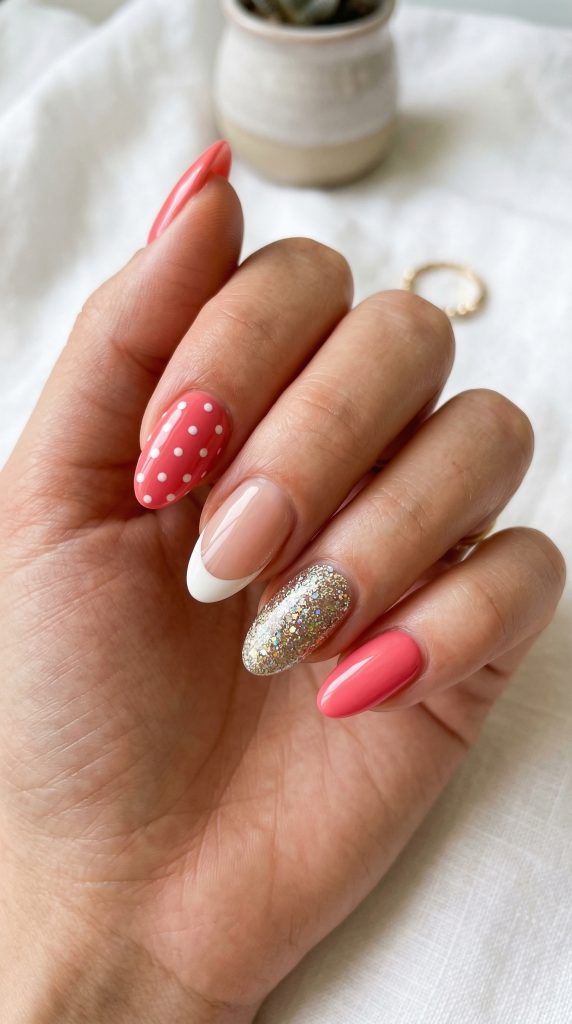
Simple starter designs:
- Solid color: Two thin coats of gel polish, cure between coats
- French tips: Paint white tips on cured polygel
- Glitter accent: Add glitter to one nail
- Simple dots: Dotting tool on cured color
Pro tip: Always cap the free edge with your top coat to prevent chipping!
Polygel Nails Tutorial: Common Mistakes and How to Avoid Them
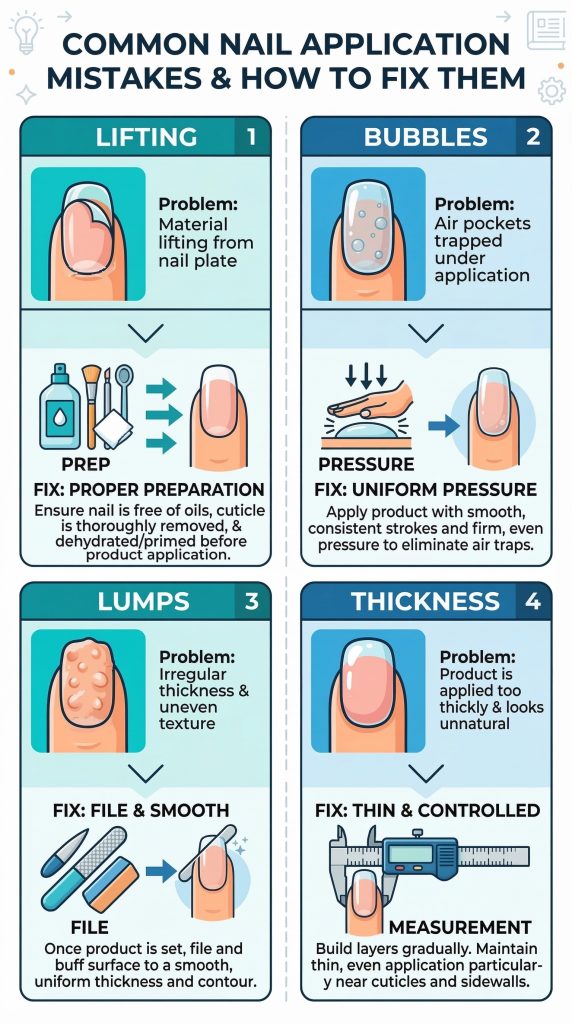
Learning polygel nails tutorial techniques comes with a learning curve. Here’s how to avoid the most common issues:
| Mistake | Why It Happens | How to Fix |
|---|---|---|
| Lifting within days | Poor prep, oils left on nail | Scrub cuticles, use dehydrator, don’t touch nail plate |
| Bubbles in polygel | Trapped air from pressing | Apply slowly, use less pressure |
| Lumpy surface | Uneven application, not filing enough | Practice bead placement, file thoroughly |
| Nails too thick | Too much product | Use smaller amounts, file more |
| Product on skin | Bead too large, poor placement | Use smaller beads, keep away from skin |
| Not curing | Lamp too weak, layer too thick | Check lamp wattage, use thin layers |
| Forms won’t stick | Not enough pressure, wet slip | Press firmly, don’t oversaturate with slip |
The “Polygel Is Too Hard for Beginners” Myth
The myth: Polygel nails are too difficult for beginners—stick to tips or press-ons.
The truth: Polygel is actually MORE forgiving than acrylics for beginners!
Why polygel wins for beginners:
- ✅ No runny liquid to control
- ✅ Won’t dry out while you work
- ✅ Dual forms provide built-in shape
- ✅ Can wipe off and restart easily before curing
- ✅ Less damage if you make mistakes
Think of polygel like playing with modeling clay versus trying to paint with runny paint. Which sounds easier to control?
Polygel Nails Tutorial: Maintenance and Longevity
Once you’ve mastered your poly gel nails tutorial, here’s how to make them last:
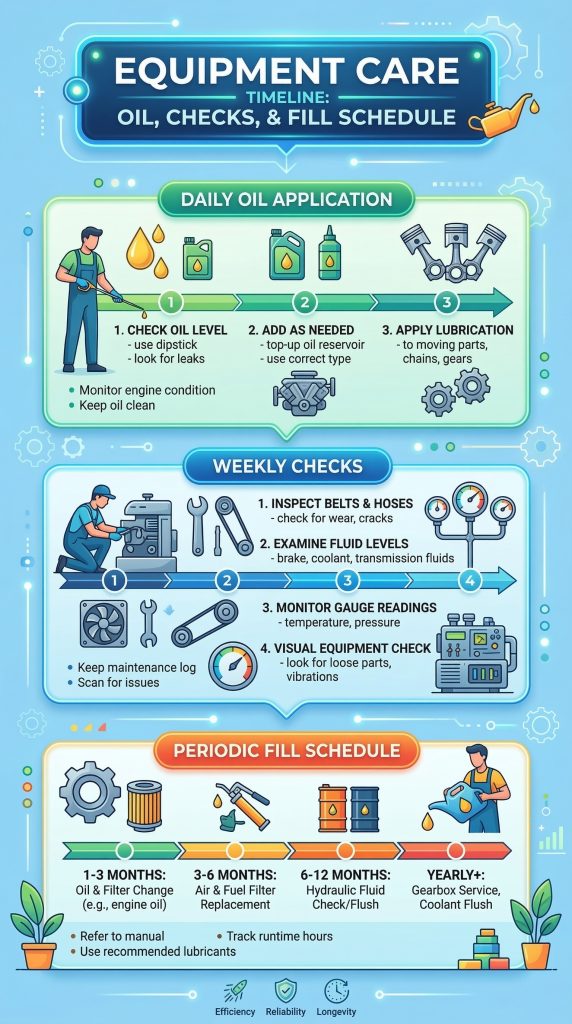
Daily Care:
- 💧 Apply cuticle oil daily (keeps polygel flexible)
- 🧤 Wear gloves for dishes/cleaning
- ✨ Avoid using nails as tools
Weekly Check:
- 🔍 Check for lifting at edges
- 💅 File any rough spots
- ✨ Refresh top coat if needed
Fill Timeline:
- 2 weeks: Quick fill if you have fast growth
- 3 weeks: Standard fill time
- 4 weeks: Maximum before full removal recommended
Pro tip: Most lifting happens from the cuticle area. Keep that area extra clean and oil-free during application!
Polygel Nails Tutorial: Removal Guide
Knowing how to safely remove polygel is just as important as application!
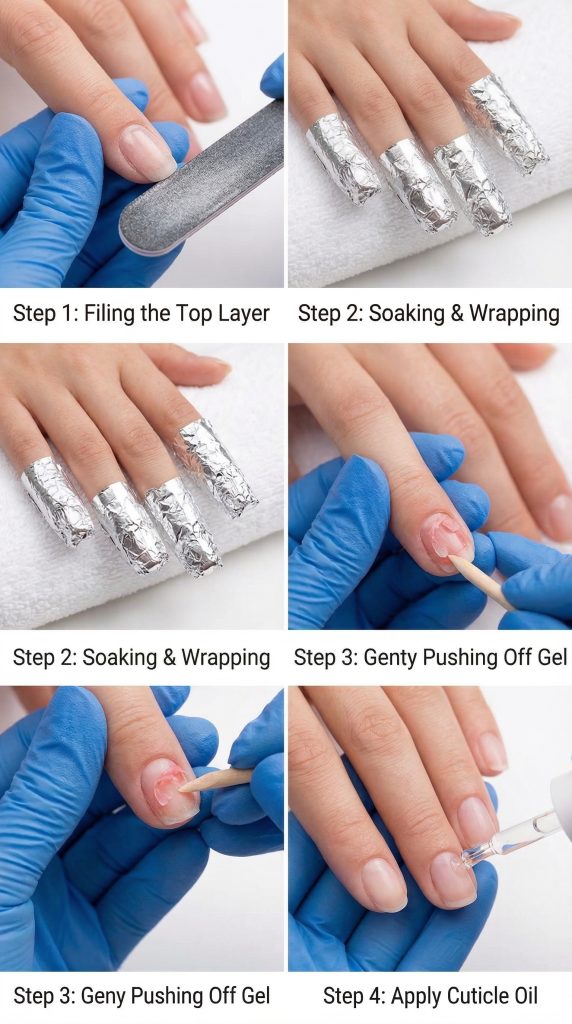
Professional Removal Process:
- File off the top layer (breaks the seal)
- Soak cotton pads in acetone
- Place on nails and wrap with foil
- Wait 10-15 minutes
- Gently push off softened gel
- Buff nails smooth
- Apply cuticle oil
What NOT to do:
- ❌ Never rip or peel off polygel (damages natural nails!)
- ❌ Don’t use excessive force
- ❌ Don’t skip the top layer filing
Polygel Nails Tutorial: Product Recommendations
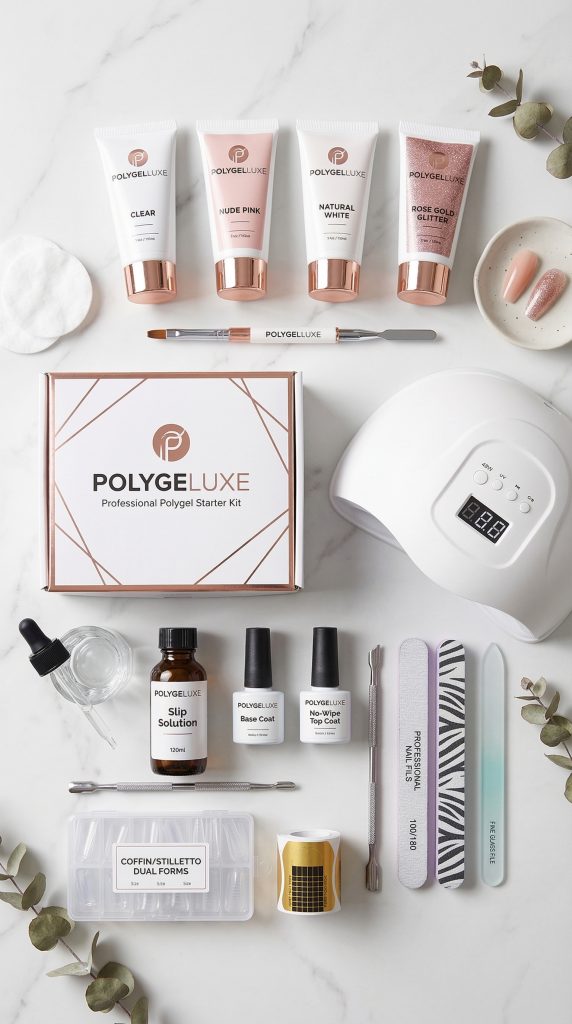
Best Starter Polygel Kits:
| Kit | Price Range | Best For | Includes |
|---|---|---|---|
| Modelones Polygel Kit | $30-40 | Complete beginners | Polygel, lamp, forms, brush, slip, files |
| Beetles Polygel Set | $35-45 | Color variety | 6 polygel colors, tools, forms |
| Makartt Pro Kit | $40-50 | Quality focus | Professional-grade products, stronger lamp |
| Gellen Starter Set | $25-35 | Budget option | Basic kit, good for testing |
Must-Have Individual Items:
- Polygel brush: Silicone is easiest for beginners!
- Slip solution: 99% alcohol works, but branded slip is better
- Lamp: At least 48W, LED is faster than UV
- Forms: Dual forms for beginners, paper forms for advanced
- Files: 100/180 grit multi-pack
Internal Link: Check out our nail tools guide for more recommendations.
Polygel Nails Tutorial: 5 Easy Designs for Beginners
Once you’ve mastered the basics of polygel nails, try these simple poly gel nails design ideas:
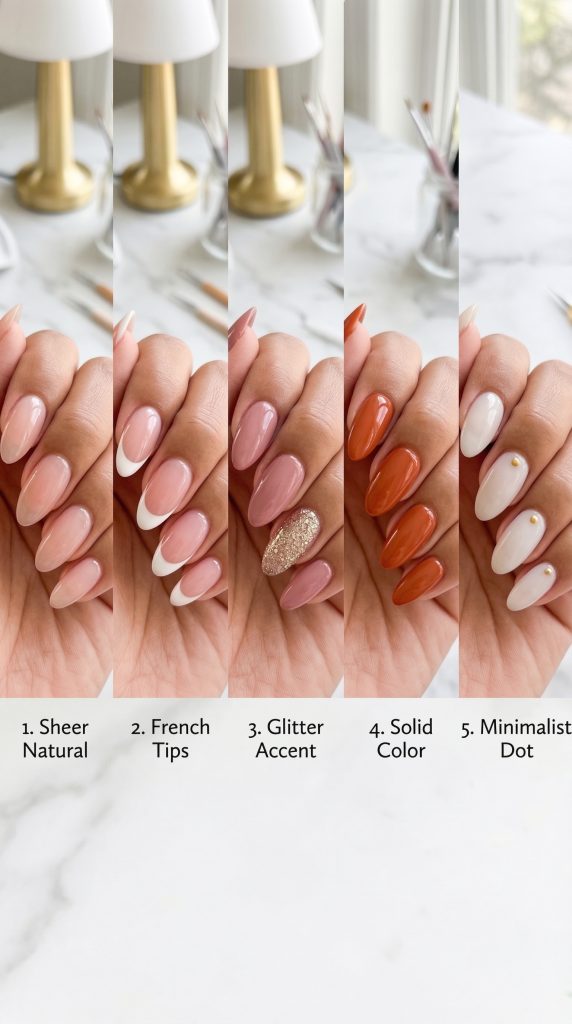
1. Sheer Natural
Clear or sheer pink polygel with high-shine top coat. Simple, elegant, and perfect for practicing.
2. French Tips
Apply sheer pink polygel, cure, then paint white tips with gel polish. Classic and beautiful.
3. Glitter Accent
Apply clear polygel, then add fine glitter to one nail before curing. Sparkly but subtle.
4. Solid Color
Choose a colored polygel (or paint over clear) for a bold, glossy look.
5. Minimalist Dot
Apply sheer polygel, cure, then add a single dot with colored gel polish on the ring finger.
Pro Tips from Industry Experts
I reached out to three top nail artists for their polygel nails tutorial secrets:
Maria Gonzalez, Miami: “The key to perfect polygel is the slip solution. Don’t be stingy with it—it’s what keeps the gel from sticking to your brush.”
David Chen, NYC: “For beginners, dual forms are your best friend. They take the guesswork out of shaping and let you focus on getting the product right.”
Lisa Reynolds, LA: “Practice on practice fingers first! You can get a silicone practice hand for under $20, and it’s worth every penny.”
Your Turn: Start Your Polygel Journey!
Here’s what I want you to do:
- Gather your supplies (start with a good beginner kit)
- Watch this tutorial (save this guide for reference!)
- Practice on one nail first (don’t pressure yourself)
- Take photos to track your progress
- Share your journey—tag me so I can cheer you on!
Remember: every polygel pro started exactly where you are now. My first set was lumpy and thick, and now I can do full sets in under two hours. You’ve got this!
Key Takeaways
- Polygel nails tutorial success starts with proper prep
- Poly gel nails tutorial techniques are learnable with practice
- Polygel is more forgiving than acrylics for beginners
- Poly gel nails can last 2-4 weeks with proper care
- Polygel nails require a UV/LED lamp to cure
- Poly gel nails design options are endless—start simple!
- Dual forms are the easiest method for beginners
- Practice makes perfect—don’t give up after one try!
Frequently Asked Questions
Q: How long does polygel take to learn?
A: Most people get comfortable after 3-5 practice sets. Be patient with yourself!
Q: Can I use polygel without a lamp?
A: No! Polygel requires UV or LED lamp to cure. Don’t skip it!
Q: Is polygel easier than acrylic?
A: Yes! No runny liquid, no strong smell, more time to work.
Q: How do I remove polygel nails?
A: File off the top layer, soak in acetone for 10-15 minutes, gently push off.
Q: Can I use polygel on natural nails without tips?
A: Absolutely! It’s great for strengthening natural nails.
Let’s Connect
I’d love to see your polygel nails creations! Tag me in your photos and share your progress.
What’s your biggest challenge with polygel? Drop it in the comments below!
This guide was proudly created for the community at What Is Builder Gel – your resource for healthy, beautiful nails.

Skilled content writer with more than five years of experience.