https://whatisbuildergel.com/builder-gel-vs-dip-powder/Builder gel is one of the most popular nail enhancements right now — and for good reason. It strengthens natural nails, adds structure, and creates a long-lasting, glossy finish that can rival salon acrylics, still wonder how to use builder gel ?
If you’re new to builder gel, this complete beginner tutorial will walk you through:
- What builder gel is
- Tools you need
- Nail prep (the MOST important step)
- Step-by-step application
- Building the perfect apex
- Curing correctly
- Shaping and finishing
- Common mistakes to avoid
- How to make builder gel last 3+ weeks
By the end, you’ll know exactly how to apply builder gel at home like a pro.
What Is Builder Gel?
Builder gel is a thick, durable gel used to:
- Add strength to natural nails
- Create extensions using forms
- Build structure (apex)
- Repair weak or brittle nails
Unlike regular gel polish, builder gel adds thickness and structure. It’s more flexible than acrylic but stronger than gel polish.
It cures under a UV or LED lamp and can last 2–4 weeks when applied correctly.
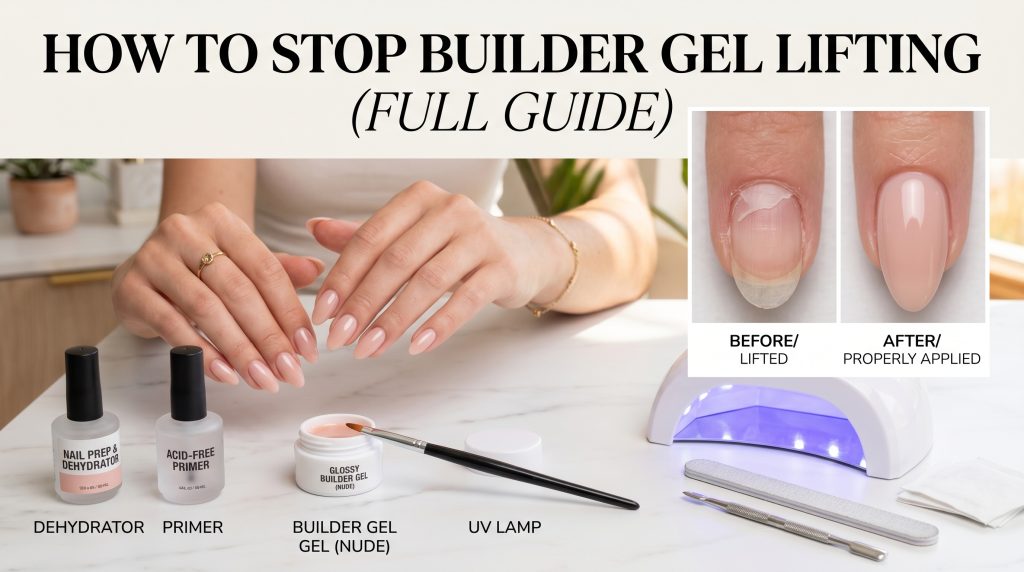
Tools & Products You’ll Need
Before starting, gather everything. Skipping tools often leads to lifting.
Essential Supplies:
- Nail file (180/240 grit)
- Buffer block
- Cuticle pusher
- Nail dehydrator
- Primer (acid-free recommended)
- Base coat (if required by brand)
- Builder gel
- Builder gel brush
- UV/LED lamp
- Lint-free wipes
- Isopropyl alcohol
- Top coat
- Cuticle oil
Step 1: Proper Nail Prep (This Prevents Lifting)
Most builder gel lifting issues happen because of poor prep.
Here’s how to prep correctly:
- Remove old polish completely
- Push back cuticles gently
- Remove cuticle growth from nail plate
- Lightly buff surface shine
- Shape free edge
- Clean with alcohol
- Apply dehydrator
- Apply primer (let air dry)
⚠️ Never skip cuticle removal. Gel touching skin = lifting.
Nail Prep Stage

Step 2: Apply a Thin Base Layer
Some builder gels are “self-leveling” and can act as a base. Others require a separate base coat.
Apply a very thin slip layer of builder gel:
- Do NOT cure yet if you plan to build structure immediately.
- Keep product away from cuticles.
- Cap the free edge.
This layer helps the next layer adhere properly.
Step 3: Building the Apex (Most Important Step)
The apex is the highest point of the nail structure. It prevents cracking and adds strength.
Where should the apex be?
- Short nails → Slightly above center
- Long nails → 1/3 from cuticle area
How to build it:
- Pick up a medium bead of builder gel
- Place it in the center
- Gently guide product toward sidewalls
- Avoid flooding cuticles
- Flip hand upside down for 5–10 seconds to self-level
The gel will naturally form structure due to gravity.
Apex Structure


Step 4: Cure Under UV/LED Lamp
Follow your product instructions:
- LED: 60–90 seconds
- UV: 2 minutes
Under-curing causes:
- Peeling
- Lifting
- Soft gel center
- Allergic reactions
Never remove your hand early.
Step 5: File & Refine Shape
After curing:
- Remove sticky layer (if required)
- File sidewalls
- Refine shape
- Smooth surface
- Dust off
Focus on symmetry.
Filing & Refining


Step 6: Apply Top Coat
Apply a thin, even layer of top coat:
- Cap the free edge
- Cure fully
- Remove tacky layer if needed
Finish with cuticle oil.
Full Builder Gel Application Summary
- Prep nails
- Apply base/slip layer
- Build apex
- Cure
- File & refine
- Top coat
That’s the full builder gel application process.
Common Beginner Mistakes
1. Skipping Nail Prep
Leads to lifting.
2. Gel Touching Cuticles
Causes peeling.
3. Applying Too Thick
Gel won’t cure properly.
4. No Apex
Nails crack.
5. Under-Curing
Weak structure.
How Long Does Builder Gel Last?
When applied correctly:
- 2–3 weeks on natural nails
- 3–4 weeks with proper apex
- Fills needed after growth
Longevity depends on prep and structure.
Is Builder Gel Better Than Acrylic?
Builder gel:
✔ More flexible
✔ More natural look
✔ Less odor
✔ Lighter feel
Acrylic:
✔ Extremely strong
✔ Best for very long extensions
For beginners, builder gel is usually easier to control.
Can You Do Builder Gel at Home?
Yes — with practice.
Start with:
- Short length
- Neutral color
- Thin layers
- Good lighting
Practice improves control.
Pro Tips for Long-Lasting Builder Gel
- Avoid water for 2 hours after application
- Wear gloves when cleaning
- Use cuticle oil daily
- Don’t use nails as tools
- Schedule fills every 2–3 weeks
Frequently Asked Questions
Do you wipe builder gel before top coat?
Depends on brand. Some require wiping, some don’t.
Can builder gel damage nails?
Not if removed properly.
Can I apply polish over builder gel?
Yes — after filing and top coat.
Do I need primer?
Most brands recommend it.
Final Thoughts
Learning how to apply builder gel takes patience — but once you master prep and apex placement, your nails can last weeks without lifting or cracking.
Builder gel is ideal for:
- Weak nails
- Growing natural length
- DIY nail lovers
- Salon-quality finish at home
With the right technique, you can achieve durable, glossy, professional-looking nails from the comfort of your home.

Skilled content writer with more than five years of experience.